Pico可以在电脑和树莓派上做开发,阿chai在这里主要介绍在电脑上的开发环境,分为C版本与MicroPython版。阿chai建议大家使用MicroPython版本。
MicroPython环境搭建
首先需要刷固件。
可将USB将Pico连接到计算机,然后将文件拖放到其中来对Pico进行编程,官方整理了一个可下载的UF2文件。
- 下载MicroPython UF2文件。
- 按住BOOTSEL按钮,然后将Pico插入Raspberry Pi或其他计算机的USB端口。连接Pico后,释放BOOTSEL按钮。
- 它将安装为称为RPI-RP2的大容量存储设备。
- 将MicroPython UF2文件拖放到RPI-RP2卷上。您的Pico将重新启动。您现在正在运行MicroPython。

上图中的IDE是官方推荐使用Thonny,但是阿chai还是喜欢VSCode,那么下面介绍一下VSCode中搭建环境。
调试工具与使用:
$ brew install minicom
$ minicom -b 115200 -o -D /dev/cu.usbmodem0000000000001
安装MicroPython的插件:

因为upload项目是需要使用串口的,因此我们进行串口配置:
# 查看groups
$ groups

# 添加
$ sudo usermod --append --groups dialout tux
使用如下代码进行测试可以看到LED的闪烁。
from machine import Pin, Timer

led = Pin(25, Pin.OUT)
tim = Timer()
def tick(timer):
    global led
    led.toggle()

tim.init(freq=2.5, mode=Timer.PERIODIC, callback=tick)
C/C++ SDK
C/C++版本的程序比较偏向底层,开发需具备嵌入式相关知识。
首先我们下载代码并安装对应的SDK。
$ git clone -b master https://github.com/raspberrypi/pico-sdk.git
$ cd pico-sdk
$ git submodule update --init
$ cd ..
$ git clone -b master https://github.com/raspberrypi/pico-examples.git
添加环境变量:
export PICO_SDK_PATH=自己设置的pico-sdk路径
调试工具与使用:
$ brew install minicom
$ minicom -b 115200 -o -D /dev/cu.usbmodem0000000000001
在VSCode中安装cmake tools:

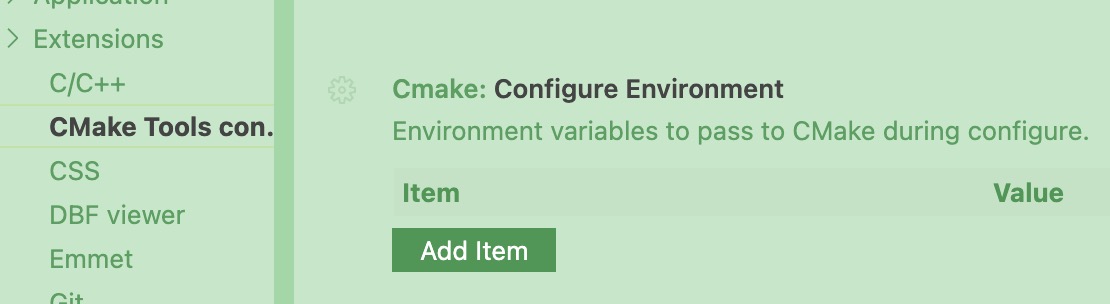
settings中找到CMake Tools configure ,点击 CMake Tools configure 选项,往下拉, 找到 Configure Environment 、 点击添加项, 在项中写 PICO_MDK_PATH 在值中填入 SDK 的安装路径。
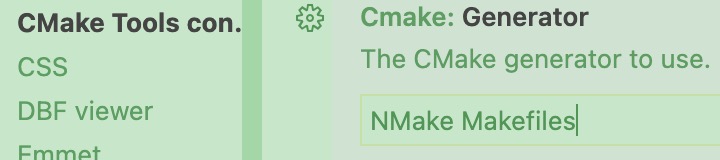
Cmake: Generator 中填写 NMake Makefiles。
安装交叉编译工具:
$ brew install cmake
$ brew tap ArmMbed/homebrew-formulae
$ brew install arm-none-eabi-gcc
在VSCode顶部的导航栏中选择arm的交叉编译工具即可使用。
可使用如下的程序进行测试:
#include "pico/stdlib.h"

int main() {
    const uint LED_PIN = 25;
    gpio_init(LED_PIN);
    gpio_set_dir(LED_PIN, GPIO_OUT);
    while (true) {
        gpio_put(LED_PIN, 1);
        sleep_ms(250);
        gpio_put(LED_PIN, 0);
        sleep_ms(250);
    }
}
CMakeLists.txt如下:
add_executable(blink
        blink.c
        )
target_link_libraries(blink pico_stdlib)
pico_add_extra_outputs(blink)
example_auto_set_url(blink)
在 bulid 文件夹中找到对应的编译生成文件 bin elf u2f 。将 U2f 拖入到 Pico 识别出的磁盘中可以看到LED的闪烁。