平衡车、手机体感、旋翼无人机的平衡主要靠陀螺模组,MPU9250是一款常用的9轴姿态测量单元。MPU9250有两个内部时钟源,以及一个PLL。
| 时钟源 | 说明 |
|---|---|
| 内部振荡器 | 功耗低,但时钟精度略差 |
| X,Y或Z方向的Gyro | MEMS时钟,功耗较高,但时钟精确(只要Gyro一经启用,就会使用该时钟源) |
时钟的选择需要综合平衡 时钟精度和功耗两个因素,所以从MPU9250的性能参数可以看到,一旦Gyro开启,功耗都是在mA级别,而加速度计和磁力计都是在uA级别的功耗。

电气元件:
| 元器件 | 数量 |
|---|---|
| MPU9250 | 1 |
| Raspberry Pi Pico | 1 |
| 面包板 | 1 |
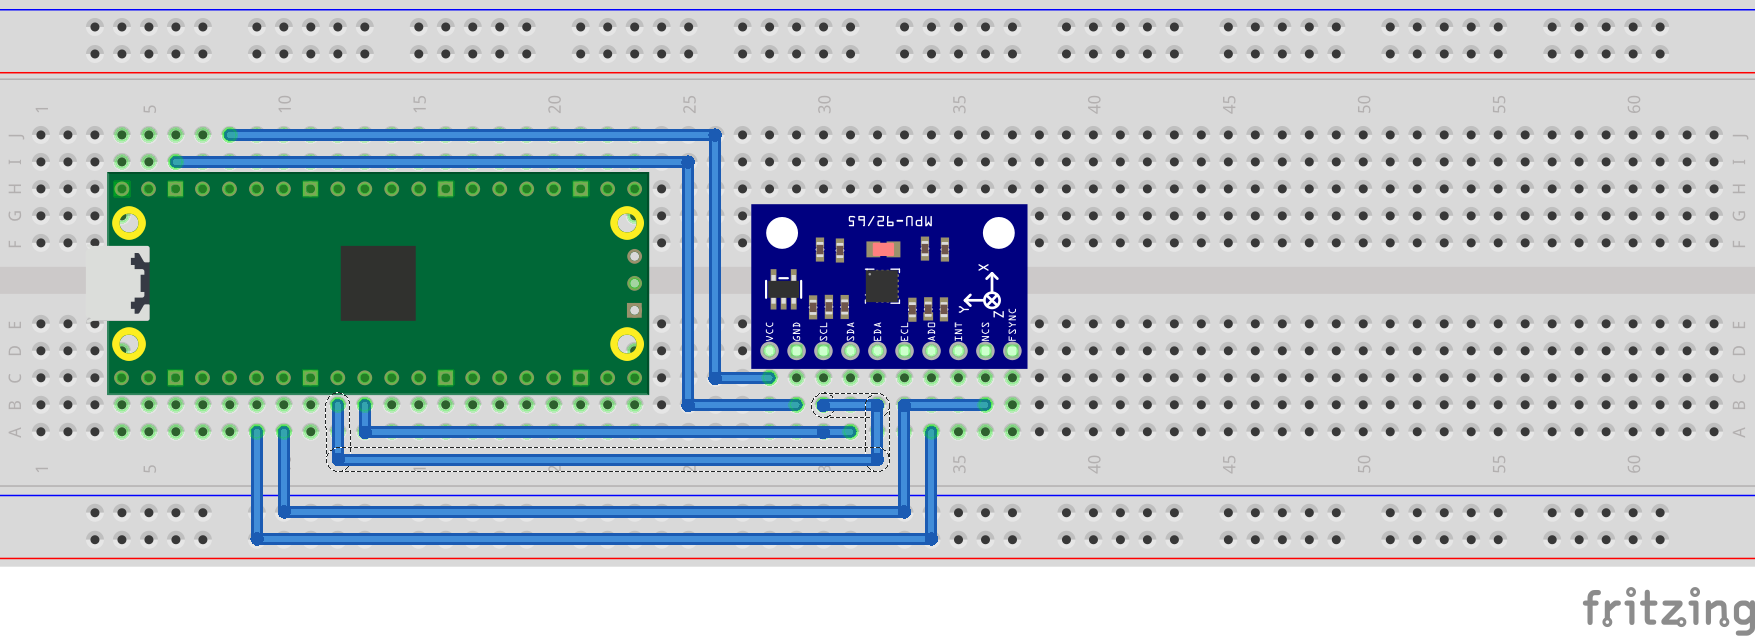
电气接线图:

demo:
#include <stdio.h>
#include <string.h>
#include "pico/stdlib.h"
#include "hardware/spi.h"
#define PIN_MISO 4
#define PIN_CS 5
#define PIN_SCK 6
#define PIN_MOSI 7
#define SPI_PORT spi0
#define READ_BIT 0x80
static inline void cs_select() {
asm volatile("nop \n nop \n nop");
gpio_put(PIN_CS, 0); // Active low
asm volatile("nop \n nop \n nop");
}
static inline void cs_deselect() {
asm volatile("nop \n nop \n nop");
gpio_put(PIN_CS, 1);
asm volatile("nop \n nop \n nop");
}
static void mpu9250_reset() {
// Two byte reset. First byte register, second byte data
// There are a load more options to set up the device in different ways that could be added here
uint8_t buf[] = {0x6B, 0x00};
cs_select();
spi_write_blocking(SPI_PORT, buf, 2);
cs_deselect();
}
static void read_registers(uint8_t reg, uint8_t *buf, uint16_t len) {
reg |= READ_BIT;
cs_select();
spi_write_blocking(SPI_PORT, ®, 1);
sleep_ms(10);
spi_read_blocking(SPI_PORT, 0, buf, len);
cs_deselect();
sleep_ms(10);
}
static void mpu9250_read_raw(int16_t accel[3], int16_t gyro[3], int16_t *temp) {
uint8_t buffer[6];
// Start reading acceleration registers from register 0x3B for 6 bytes
read_registers(0x3B, buffer, 6);
for (int i = 0; i < 3; i++) {
accel[i] = (buffer[i * 2] << 8 | buffer[(i * 2) + 1]);
}
// Now gyro data from reg 0x43 for 6 bytes
read_registers(0x43, buffer, 6);
for (int i = 0; i < 3; i++) {
gyro[i] = (buffer[i * 2] << 8 | buffer[(i * 2) + 1]);;
}
// Now temperature from reg 0x41 for 2 bytes
read_registers(0x41, buffer, 2);
*temp = buffer[0] << 8 | buffer[1];
}
int main() {
stdio_init_all();
printf("Hello, MPU9250! Reading raw data from registers via SPI...\n");
// This example will use SPI0 at 0.5MHz.
spi_init(SPI_PORT, 500 * 1000);
gpio_set_function(PIN_MISO, GPIO_FUNC_SPI);
gpio_set_function(PIN_SCK, GPIO_FUNC_SPI);
gpio_set_function(PIN_MOSI, GPIO_FUNC_SPI);
// Chip select is active-low, so we'll initialise it to a driven-high state
gpio_init(PIN_CS);
gpio_set_dir(PIN_CS, GPIO_OUT);
gpio_put(PIN_CS, 1);
mpu9250_reset();
// See if SPI is working - interrograte the device for its I2C ID number, should be 0x71
uint8_t id;
read_registers(0x75, &id, 1);
printf("I2C address is 0x%x\n", id);
int16_t acceleration[3], gyro[3], temp;
while (1) {
mpu9250_read_raw(acceleration, gyro, &temp);
// These are the raw numbers from the chip, so will need tweaking to be really useful.
// See the datasheet for more information
printf("Acc. X = %d, Y = %d, Z = %d\n", acceleration[0], acceleration[1], acceleration[2]);
printf("Gyro. X = %d, Y = %d, Z = %d\n", gyro[0], gyro[1], gyro[2]);
// Temperature is simple so use the datasheet calculation to get deg C.
// Note this is chip temperature.
printf("Temp. = %f\n", (temp / 340.0) + 36.53);
sleep_ms(100);
}
return 0;
}
CMakeLists.txt:
add_executable(mpu9250_spi
        mpu9250_spi.c
        )

# Pull in our (to be renamed) simple get you started dependencies
target_link_libraries(mpu9250_spi pico_stdlib hardware_spi)

# create map/bin/hex file etc.
pico_add_extra_outputs(mpu9250_spi)

# add url via pico_set_program_url
example_auto_set_url(mpu9250_spi)